My mother-in-law bought my one year old a really cute headband from Gymboree for her birthday. It is so cute! To the right is a photo of the original Gymboree headband:
I decided to measure it and make a copy of it in the same fabric as her Easter dress. It is so adorable. She is 14 months old. This fits her well, but you can add or take away elastic at a shown part in the tutorial to get it to fit your baby's head just right.
Materials needed:
1/4 yard of fabric
4 inches of 1/4th inch wide elastic
coordinating thread
I used fabric from Emilie Daly Designs, Mary Jencks line at Modern Yardage.
http://www.emiliedalydesigns.com/
https://pinterest.com/emdalydesigns/
https://www.facebook.com/emiliedalydesigns
The best part about her designs is that they are sold online. Each design can me purchased in 3 different sizes. You can buy them at Modern Yardage here: http://www.modernyardage.com/shop/category/shop-by-category/mary-jencks-by-emilie-daly/
I used these fabrics:
Fan Flare in Pink, Large Fan Flare in Pink, Medium
- HEADBAND: From the large print fabric, I cut a rectangle 15 1/2 inches x 3 1/4 inches.
- Fold the rectangle in half, lengthwise, with right sides together. Stitch a 1/4 inch seam. Gently press the seam open, with the tip of the iron, without ironing the edges.
- Using a bodkin or safety pin, flip it so the right side is out. Press flat making sure the seam is in the middle.

- Iron in the sides on the end to form little trapezoids. Fold it in on a diagonal. Do this for both ends. Here is a front shot and a back shot of what to do:


- BOW: From the medium print fabric, cut a rectangle 4 1/2 inches x 10 inches.
- Fold the rectangle in half, lengthwise, with right sides together. Stitch a 1/4 inch seam. Gently press the seam open, with the tip of the iron, without ironing the edges.
- Using a bodkin or safety pin, flip it so the right side is out. Press flat making sure the seam is in the middle.

- Stitch ends together so the rectangle forms a circle.
- MIDDLE OF BOW: Cut a strip 1 1/2 inches x 2 1/4 inches.
- Fold the rectangle in half, lengthwise, with right sides together. Stitch a 1/4 inch seam. Try and press the seam open.
- Using a bodkin or safety pin, flip it so the right side is out. Press flat making sure the seam is in the middle.

- Press the ends over 1/4 an inch. Press towards the back side (part with the seam).
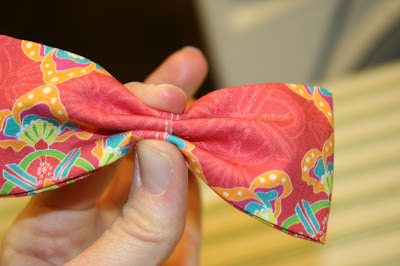
- BOW ASSEMBLY: Take the bow and pinch it in the middle. Have it fold three times up and down so it looks like this: This will be the front.
- Use a needle and thread to hand stitch the strap closed and in place. Make sure the bow won't slide up and through the strap and is securely on the headband.
- Fold the rectangle in half, lengthwise, with right sides together. Stitch a 1/4 inch seam.
- Using a bodkin or safety pin, flip it so the right side it out. Press flat making sure the seam is in the middle. Fold 1/4 inch of the ends of casing inside the casing.

- Cut a strip of elastic that is 4 inches long. If you want a larger headband than for a 14 month old, you may want to cut a strip a little longer.
- Slide the elastic into the casing. Slide the end of the headband into the same side of the casing. Make sure you have the headband, casing, and elastic all at one end. Pin. Stitch all three together.
- Attach the other end of the elastic to the other end of the headband. MAKE SURE TO TRY IT ON THE BABY AT THIS PHASE, BEFORE YOU SEW THE CASING COMPLETELY OVER THE ELASTIC. Take out some elastic until you get the right fit. (I had to take out 1 1/4 inches of elastic to get the right fit for my 14 month old.) Also make sure the elastic is attached well and will not come out when pulled.
- Finish off the headband by sewing the casing over the elastic. Make sure to cover all unfinished edges.

- You are finished! Enjoy your new, cute Gymboree inspired headband!


